| Activation Date: 5 August 2017 | |
| Transport: Run/Hike/Climb | Distance: 10 miles |
| Elev. gain: 2750ft | Time: 5 hours |
| Rig(s): FT-817, VX-2R | Band(s): 40m, 20m SSB, 2m FM |
| Antenna(s): End-fed half-wave, 12.5 inch flex whip | |
| Cell Service: Good (T-Mobile) | |
| Parking: Big Meadow Tahoe Rim Trail Trailhead | |
| Trailhead: Round Lake | |
| Fees/Permits: None | |
| Route: Tahoe Rim Trail, Pacific Crest Trail, Off-Trail | |
| Dogs: Yes | Toilet: No |
While on a backpacking trip to Round Lake with friends, I wanted to see if I could squeeze in a little bit of summit action. Originally, I was only going to attempt Stevens Peak, by heading up to a nearby ridge and approaching from the north. Upon doing some more research, I realized I could add a little bit of distance and grab both Red Lake Peak and Stevens Peak in one go. I looked at several trip reports on PeakBagger.com—most of them consisted of a day hike to both peaks, approaching from the south. So I put together a hybrid of that approach and planned to get an early start on the second day of our backpacking trip, and do it trail-running style.
Getting there

Looking back at Big Meadow
I won’t cover this part in detail, since this post isn’t about my backpacking trip. On Friday, we hiked in to Round Lake from Big Meadow. It’s a really beautiful hike, and gently uphill most of the way. Arriving around dinnertime, we set up camp and enjoyed the evening. One of my friends was possibly interested in running the first few miles of my summit trip with me, so we agreed on a time the next morning — 5:15am. If she was out and about we’d start off together. I packed snacks and other necessities in my running vest and hung it up with our bear bag. I went to bed and had a somewhat restless night of sleep, as I usually do the first night at high elevation (8000+ft).
The run and climb to Red Lake Peak
I got up around 4:30am (I like to have time to prepare before setting off). The moon had been lighting everything up nicely the night before, but had set sometime during the night, so I had to use my headlamp to get ready. Once I got all my stuff packed up and felt reasonably ready to go, I noticed my potential running buddy was stirring (I could see her headlamp). I had shut off my headlamp and put it away by this time, since there was just barely enough pre-dawn light to see. She asked if I could wait a few minutes. I agreed and we left a few minutes later.
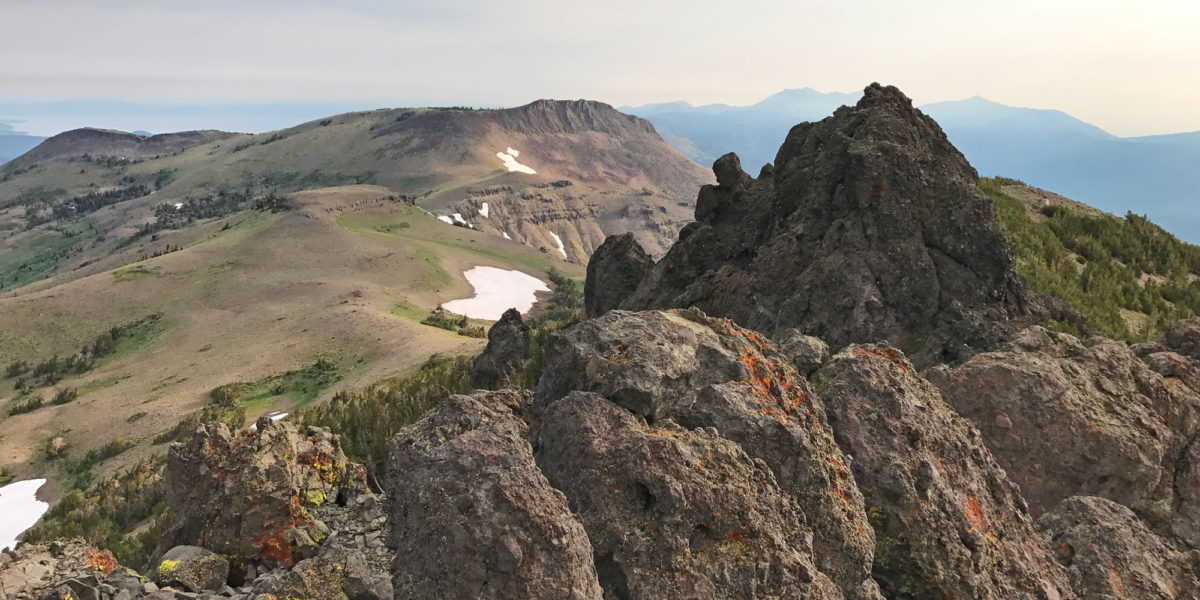
Starting out on the Round Lake spur trail leading to the Tahoe Rim Trail, we just walked — there wasn’t quite enough light to run on this trail, since it’s pretty rough. A few minutes later, back on the Tahoe Rim Trail, we picked up the pace. Heading south along the lake, we kept quiet, since there were a number of people camping at various spots around the lake. Once past the lake we were able to chat freely. The trail maintained a steady uphill climb for one or two miles, then flattened out. At about 2 miles, I got my first view of Red Lake Peak.

Red Lake Peak – group of crags right of center
Just under 3 miles into it, the Tahoe Rim Trail joined up with the Pacific Crest Trail, near the Meiss Family Cabin. This is where my running partner decided she’d turn around and head back to camp. We didn’t linger long, since the mosquitoes were out in force. I wished her a good run back (and cursed the mosquitoes) and got on my way. Heading south on the Pacific Crest Trail, I thought about how I’d love to hike the entirety of it someday. Especially when seeing sections like this.

Heading SE on the PCT
Though I figured my planned approach to Red Lake Peak would be fairly obvious, I wanted to stick to the planned route as closely as possible. I had drawn my route and imported it into my Topo Maps app on my phone (and had a backup map). The planned route was based on careful study of both topographic maps and Google Earth imagery. I didn’t want to find myself stopped by impassable ravines or cliffs. At my running pace, it wasn’t long before I reached my turn off the trail. The trail starts climbing and Red Lake Peak is clearly visible. I started my off-trail climb up the mountain on a little ridge next to one of several drainages coming off the mountains.

About to head left, up around the snow
The hike up to the peak was straightforward enough, with only very light bushwhacking here and there, mainly on the steeper sections. Amazingly, the mosquitoes that were bothering me down in the valley, continued to bother me more than half way up the climb. But they eventually went away. As I started to climb, views of the surrounding mountains and valleys really started to open up. So beautiful!

Looking south – Round Top and The Sisters
At around 9200ft, I decided to cross a snowfield at a fairly flat section, to continue the climb east-northeast with less foliage in the way.

Snowfield at 9200ft
This late in the season, these snowfields are really dense, so they’re easy to walk on. This one was quite thick in places, too!

That’s lots of water!
At about 9700ft, I came across a use trail that approached the summit from the south. I started following this north-northwest to the summit.

Use trail to the summit
Before long, I was on the summit plateau. I took a few minutes to take in the scenery and evaluate next steps. I wasn’t quite in the activation zone yet, according to my altimeter, and there was an imposing summit block that looked like it would need to be climbed to get to the elevation I needed. Plus, having come all this way, why not get all the way to the top!

Southernmost summit block
I initially thought I’d have to climb the chute in the middle of the block, but once I started climbing, I found there was a slightly easier route around the right/east side. I made it up to the top of this block in just a couple of minutes. It turns out that perhaps this first block isn’t the highest one, but it was close enough for me, and well within the activation zone for SOTA. Even with a bit of smoky haze, the views were simply amazing! Lake Tahoe was even partially visible.
I spent some time enjoying the views and getting some pictures, then started setting up my antenna.
Operation on Red Lake Peak
Since I have an end-fed half-wave antenna, for a while now, I’ve been meaning to try dropping it vertically off of a steep summit/cliff. This peak was a perfect opportunity. After unwinding all of the wire and some of the paracord, I left the winder on the end and threw it off the cliff (keeping one end of the wire in hand, of course). I deployed my 5m squid pole in a diagonal position, jutting out over the drop-off. I ran my wire through my attachment near the end of the pole and over to my radio, about 15 feet from the drop-off. This created a big inverted L, with the short end horizontal, going into my radio, and the remainder vertical along the cliff face. This would turn out to be a very effective setup.

Highlighted antenna wire
For all I know, some part of the wire might have been touching rock, but the weight of the winder at the end kept things from moving around too much, and there wasn’t much wind. So SWR remained low once dialed in.

A fine operating position
I got to work finding a clear frequency on 40 meters. I had cell service, so I was able to post a self-spot and get going. Within 15 minutes of my first CQ, I had 9 QSOs on 40 meters—including two summit-to-summits with K3OG on Tiger Mountain, W7W/KG-115 and NS7P on Hamaker Mountain, W7O/CE-051. Once things got quiet on 40 meters, I moved over to 20 meters and found a clear frequency. Another 10 minutes there and I had another 9 QSOs, including yet another summit-to-summit, this time with WC6J on Earthquake Dome, W6/SS-284. I think that’s a record number of S2S in a single activation for me! I’m going to have to make a point of checking for other activations when I have cell service. Summit-to-summit contacts have just a bit more magic!
One of the last stations that tried calling me was Ken, N7BR—a long-time friend of mine up in Washington state. He was coming in pretty weakly, but I was able to copy his call sign. Then some lid started tuning up over us. Over and over. I tried a few more times, but couldn’t make it work. OK, time to go. I started packing up. I kept my FM handheld radio on 146.52. At such a high elevation, and with a decent amount of prominence, I had heard people chatting way out in the Central Valley (over 50 miles away), and others over near Lake Tahoe (10-15 miles away). As I was starting to pack up, Jay KE6GLA called me on 146.52. He had seen my other spots and figured I might be listening on VHF, too. Another QSO in the book—and this one was 55 miles away on my little 1.5 watt radio! Not bad.
With that, I got packed up and got ready to head over to Stevens Peak, which I could easily see from Red Lake Peak.

Looking at Stevens Peak (right, reddish-brown ridge)
The traverse to Stevens Peak
To climb down from Red Lake Peak, I took a different route, heading north off of the summit block I was on. I then skirted around the east side of the remaining summit blocks, to a gentler part of the summit ridge to the north. Here appeared a bit of a use trail. I followed that for a bit, until it disappeared at a very steep slope. I started down this slope, carefully. It was a fairly steep talus slope—lots of loose rock. From here, I was able to get a pretty good look at most of my route to the next summit.

Looking along the saddle between the two summits
Going first to the right (east) then left (west), I was able to avoid a little bit of a cliff and work my way onto the saddle between the summits. Once on the saddle, the going was quite easy. In fact, another use trail appeared, and I followed that for a bit until it disappeared again, near a rocky outcropping/ridge jutting out from the saddle. At this ridge, I had to decide to go around it to the left or right, or over it. I decided to go to the left, based on what I was seeing on the topographic map (possible cliffs). This turned out to be the correct decision. As I was starting to go around the west side of this ridge, I heard a whistle. I hadn’t seen a single human since parting ways with my running partner in the valley below, and this was a distinctly human whistle. It turned out to be a guy named Brian (or Bryan?), also headed for Stevens Peak. He had been traversing the slopes below, starting a mile or two south of here on the Pacific Crest Trail. We discussed the route and possible distance. He seemed to think a different, farther terrain feature was Stevens Peak. It seemed he determined I better knew where I was going, so he decided to follow me. Coming around the northwest side of this ridge, I got my first up-close view of the summit.

Getting closer to Stevens Peak!
After the little ridge, another use trail appeared, which I followed. It eventually disappeared again, but the way was clear—up a talus slope to the summit ridge.

Up to the left and onto the summit ridge we go!
Carefully negotiating lots of pretty solid talus, I finally made it to the summit ridge, where there was a pleasant plateau covered in grass, with some trees. Probably a pretty pleasant place to camp, actually, if one could bring enough water up!

Summit plateau
The summit was just another 200 yards or so. Having made it to the summit, Brian and I explored a bit, and took each others’ photos.

Rex KE6MT on the summit of Stevens Peak
While looking around, trying to decide how to do my antenna, I noticed a summit register box. I pulled that out and signed the log. Looks like it’s a fairly popular summit—there were lots of entries!

Summit register
With that taken care of, it was time to make some contacts!
Operation on Stevens Peak
By this time, I was starting to hurry a little bit. It was getting late, and I had a time I needed to be back at camp—not to mention the possibility of mid-day thunderstorms. So after looking around a bit, I decided I wouldn’t easily be able to do the vertical inverted-L I did on the last summit. I ended up just running the wire from one crag on the summit to another. It was a mostly horizontal orientation, no more than perhaps 5 feet off the ground for most of it. It was oriented east-west, so likely radiated north-south, and possibly with more signal going up than towards the horizon, depending on the makeup of the summit’s rock.
Since I was in a hurry, I didn’t remember to do my usual photo routine, showing the 360-degree view, my radio and antenna setup, etc. I just got set up and started operating. I found a clear frequency on 40 meters, spotted myself, and got one contact. Then I started having QRM (interference) from a nearby station. Instead of trying to work through it, I switched to 20 meters, found a clear frequency, spotted myself, and started calling there. I quickly got 5 QSOs there, including two more summit-to-summits! The first S2S was with KD0YOB over in Colorado, on Cascade Mountain, W0C/PR-059—a first activation of that one for him! The second was with KM6DQU in southern California, on Smith Mountain, W6/CT-120.
In between calling CQ, I answered questions for my tagalong hiker, Brian. Some were questions he asked, some were things I thought he’d like to know. He seemed really fascinated with the whole ham radio and Summits on the Air thing. He almost couldn’t believe I was talking to people hundreds of miles away.
Once responses slowed down, I didn’t waste any time in getting packed up and heading off the summit. I had to get back to camp before my wife and friends started worrying. Time to get moving!
Descent and return to Round Lake
I had planned two possible descent routes from Stevens Peak: either along the ridge to the north-northwest, which would be a somewhat gentle but long descent, or straight down to the valley, down slope to the west of the summit. I opted for the straight-down descent. Prior to this outing, I had mapped it out using study of the topographic map and Google Earth. There were definite cliffs and other obstacles to avoid.
Brian asked if I minded him tagging along, so he could find his way to the trail and go visit Round Lake himself. I told him I definitely didn’t mind, but that my route was no guarantee of safety or fun—it could suck! With that, off we went!
Heading back down, I used a combination of reading the terrain and looking at my topo map to make sure we didn’t encounter any dead-ends/cliffs. It was a very steep descent with lots of loose rock. Since I was doing this trip fast and light, I didn’t have poles, so I slid and fell several times—no big deal but a bit embarrassing!

Brian following on the loose, steep slope
Getting nearer the bottom, the views were just as incredible. The loose rocky slope gave way to more and more vegetation, too, making the descent both easier and more difficult near the bottom.

Looking south on the descent
Down in the valley, the bushes, grass, and trees seemed to sprout countless mosquitoes as I passed through them. Eventually, I found my way back to the trail, and let Brian know I’d be running from here. I told him we were camping on the north side of the lake and that maybe I’d see him later. As it turned out, my friends had moved camp while I was gone. Amazingly, Brian still managed to find us to stop by and say hi.
It was a long and somewhat exhausting 10 miles, but boy, was it fun!
Activation Logs
Red Lake Peak
| Time | Call | Band | Mode |
| 15:26z | AC0PR | 7MHz | SSB |
| 15:28z | K3OG | 7MHz | SSB |
| 15:30z | K6HPX | 7MHz | SSB |
| 15:32z | NG6R | 7MHz | SSB |
| 15:33z | K7ZO | 7MHz | SSB |
| 15:34z | W7RV | 7MHz | SSB |
| 15:35z | NS7P | 7MHz | SSB |
| 15:35z | KM6HAU | 7MHz | SSB |
| 15:37z | WA7SB | 7MHz | SSB |
| 15:40z | AC1Z | 14MHz | SSB |
| 15:43z | N7AMA | 14MHz | SSB |
| 15:44z | W0MNA | 14MHz | SSB |
| 15:45z | N4EX | 14MHz | SSB |
| 15:47z | WC6J | 14MHz | SSB |
| 15:48z | K9VIT | 14MHz | SSB |
| 15:49z | K3TCU | 14MHz | SSB |
| 15:50z | KM6BMQ | 14MHz | SSB |
| 15:50z | W0ERI | 14MHz | SSB |
| 15:53z | KE6GLA | 144MHz | FM |
Stevens Peak
| Time | Call | Band | Mode |
| 18:06z | N6DNM | 7MHz | SSB |
| 18:11z | W7RV | 14MHz | SSB |
| 18:12z | KD0YOB | 14MHz | SSB |
| 18:15z | K7ZO | 14MHz | SSB |
| 18:16z | NY0Q | 14MHz | SSB |
| 18:18z | KM6DQU | 14MHz | SSB |
Map