When I started my amateur radio life as KK6VSI in August of 2015, I wish I could have had the information I’m about to lay out here. Of course, most of the equipment didn’t yet exist. So another way of looking at it is that my entry into amateur radio was perfectly timed for a modern Golden Age of Ham Radio. Part of this Golden Age means you can get a QRP Labs QCX or BITX40, and a QRPGuys Antenna, plus a few other components, and you’re on the air! Stick with me here, and we’ll get to the details.
The Golden Age of Amateur Radio
I’ll probably write more about this in other posts, but I believe that we are indeed in the midst of a golden age for amateur radio. Never before have we had such easy access to information, parts and kits needed to get on the air and to experiment. From microcontrollers to easily available parts and information, never have there been more possibilities for experimentation. With ingeniously-designed inexpensive kits, it’s easier than ever to get on the air. Whether it’s VHF/UHF, HF, microwave, or all of the above—if you’re interested, you can do it. I’m not the first person to say this. My friends over at the Ham Radio Workbench podcast have talked about it several times.
On top of all that, if you look in the right places, the “ham spirit” is alive and well. There are people that will go out of their way to help you explore this great hobby. I’ve had the good fortune to meet several of them. I try to pay it forward whenever I can.
So You Want to Bounce Signals Off the Ionosphere?
What I’m going to cover here is a specific cross section of all of this—getting on the air in the high frequency (HF) bands, on the cheap. I’m going to assume you already know what HF is, and that you’re just figuring out how you can get there without breaking the bank. For some, the magic of ham radio is in designing and building radios. For others, it might be experimentation in the microwave bands. Or maybe you just like to talk on repeaters (or build them). For me, it’s in the HF bands. I just really love the magic of directly making contact over hundreds (or thousands) of miles. That’s what this post is about. I’m going to dive into a bit of my history, and the why of this post, which you can skip if you want. Just go to the section titled “Get Going.”
QRP (low power)
QRP is defined mostly as: 5 watts (or less) coming out of the transmitter. Sometimes there’s a split definition of 10w SSB, 5w CW. I do like the idea of the 10w SSB definition, since SSB is at such a disadvantage at these power levels. People do QRP for different reasons, such as:
- It’s challenging (this is a mixed bag)
- Lighter/smaller equipment
- Lower risk of RF issues/burns
- Simplicity of equipment/kits
- Cost
There are other reasons, but I believe those are the key ones. For me personally, it’s pretty much a mix of all of those. Perhaps the least of which is the “challenging” one. Sure, I love a challenge. But I didn’t get into ham radio so I could not make contacts on my radio! And that is where CW/Morse code comes in.
Morse Code / CW
Yes, Morse code. Continuous wave (CW) transmission. Many people I know have said “they still do that?!” Absolutely. I don’t have any hard statistics on this, but my impression is that interest in it may have died off a bit when the FCC removed it as a requirement to get your license, but I think it’s making a strong comeback. I might go so far as to say that, at least toward the end of the requirement/incentive stage, there might have been even less interest overall. Now it’s an optional part of becoming a ham. And I may get some flak for saying this, but: I like it. I’m quite glad the requirement was removed. It kept me from pursuing ham radio for quite a while. When I found out the requirement was gone, I jumped right in! Then I got interested in Morse code!
Why CW? Here’s what I said in another post, when I did my first SOTA activation using CW:
“Well, because it’s easier. For me personally, there are many other reasons, including the fact that it’s both fun and challenging to operate. But let’s get back to the fact that it’s easier. Let’s put it this way: would you rather try and make contacts with a 5-watt radio or an 80-watt radio? Using the Morse code to operate CW gives you that advantage without using an amplifier. And the radio can be even more simple, saving on weight and power consumption.“
I didn’t know all of that when I started, so I’ll get back to this.
Getting My Start
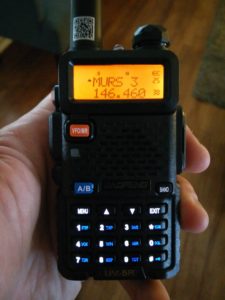
One of my first radios
When I first started in ham radio, I got the cheapest handheld radio I could find. I had a couple of these and had them all programmed up, listening to various things as I studied for my exam. It was thrilling. The idea that, once licensed, I could use a little handheld radio to talk through a repeater to any ham in the greater SF Bay Area was more than enough motivation to get me through the necessary study and exams.
After getting licensed, and getting bit more experience under my belt, I graduated to better VHF/UHF radios. Still, HF seemed out of reach, financially. I have a family to help support and I suppose I should probably be setting aside for my kids’ college and I might even want to retire some day! There just isn’t a bunch of “hobby cash” to throw around. Looking around, I noticed there were a lot of CW-only radios and kits. So I started getting interested in Morse code as a possible inexpensive route to HF.
Thinking one of those eBay “Super Rockmite” kits might be a good, inexpensive entry into HF, I bought one of those and never finished putting it together. There are barely any instructions. But, not having had any HF experience, I didn’t know what I was missing, nor the limitations of such a rig—not a good entry point.
I ended up borrowing a very nice HF rig (a 100-watt Icom transceiver) from a local ham, and proceeded to mess around with voice and data modes. Morse code took a back seat.
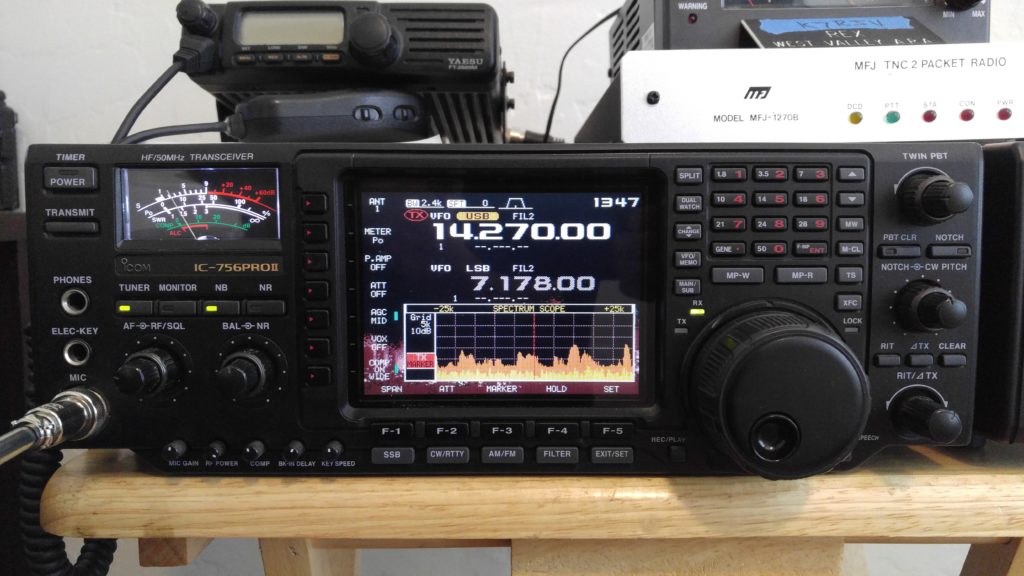
I borrowed a very nice HF rig!
I eventually ended up getting a used FT-817 and returned the 100-watt rig to its owner. I then started to find out just how hard it is to make contacts with less than 5 watts of voice. I mean, it was hard enough doing it with 100 watts!
SOTA
I got into Summits on the Air because I love hiking and mountains, and just generally being in the outdoors. SOTA gave me something to do at the top of all those summits I loved to climb. This is where I learned of the advantages of an RF-quiet environment, and how much easier it is to make contacts when people are working hard to contact you.
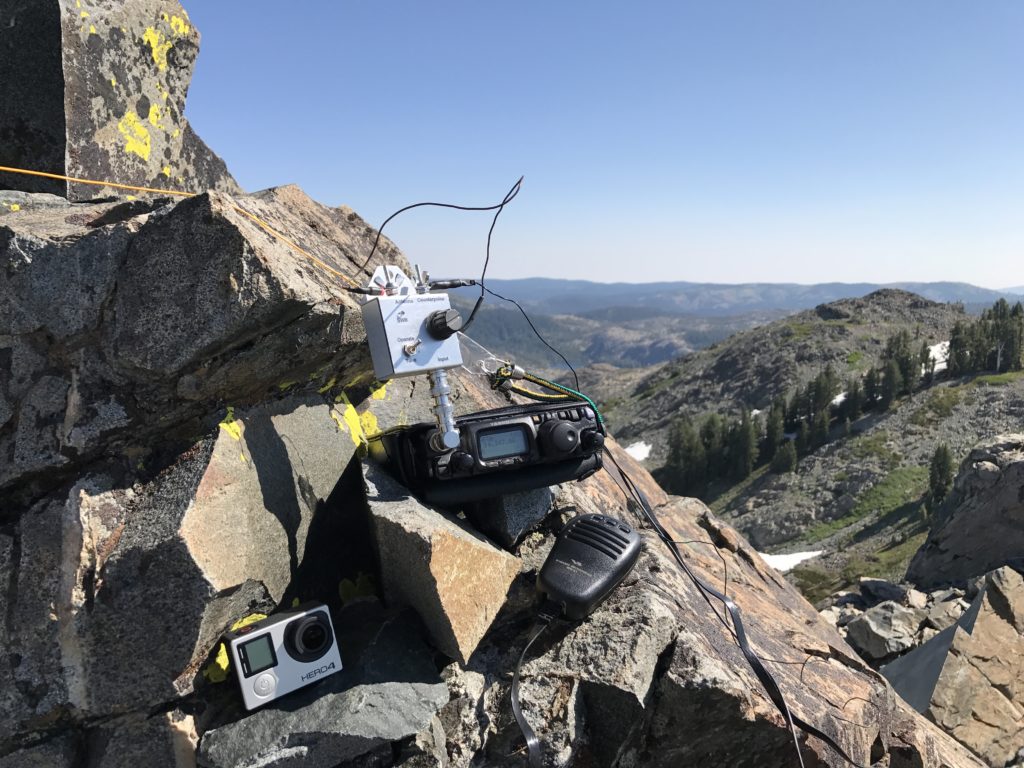
SOTA in the Sierras
This is also where I started to get reacquainted with Morse code. In North America last month, over 70% of SOTA activations were CW-mode. There are solid reasons for that. The two top reasons, the way I see it:
- Lighter, more compact equipment means less work getting it to the summit.
- You’re more guaranteed to make the required 4 contacts (and then some!) using Morse code.
This led me down the path of finally learning Morse code. I used various online tools and apps, such as Morse Toad and LCWO.net. These were a great start. But the most successful thing I did was to enroll and participate in CWops CW Academy. I completed Level 1 and shortly after finishing that, was on the air doing SOTA activations using Morse code. I also got a really good deal on a Mountain Topper MTR-3B—a really great little CW-only rig.
I’ve continued to have great success with CW as an operating mode. But I got to thinking: wouldn’t it be great if someone could have shown me the way to HF early on? If I’d known about CW Academy, and if the right CW rig would have existed, it’d be a magical combo! So here we go.
Get Going
Here’s what I think a great entry into HF would be, for a ham on a budget. The key major components would be:
- QRP Labs QCX single-band transceiver kit – 40 meters version
- QRPGuys Portable No Tune End Fed Half Wave Antenna
- QRPGuys Iambic Mini Paddle with Base
- CWops’ CW Academy
QRP Labs has designed an impossibly low-cost, high performance transceiver with the QCX. Hans Summers, G0UPL, is doing a great service to the amateur radio community by designing such a kit.
And then there’s QRPGuys. I don’t know how they offer their kits at such low prices, but you’d be hard-pressed to source the parts yourself for a lower cost. They have nicely-designed kits at almost-impossible costs. The only time their stuff gets slightly pricier is if you live outside the US. The shipping costs go up quite a bit. I’m guessing there are probably creative ways around that, but even if you factor it in, their kits are still very low cost.
You’ll need some stuff to support this setup, such as power and various connectors/adapters. I’m going to leave it up to you, how you want to do it, but here’s what I have:
- 1500mAh LiPo battery, with Anderson Powerpole connectors added by me, and some kind of LiPo charger. I got these things from HobbyKing.
- BNC Barrel Connector (male-male)- connect end-fed antenna matching unit directly without coax
- QRPGuys Tuning Indicator – indicates SWR and protects rig when in “tune” mode
- Antenna wire—you supply the wire for making the end-fed antenna. Almost any wire will do, but 20-24awg is best. I like getting my wire from SOTABeams.
All of this should come in around $100-150USD. If you simply don’t want to do Morse code, there’s the option of the BITX40, a very inexpensive HF SSB rig that runs on 40 meters. But in my opinion, if you can invest the time to learn Morse code, it is a much more fulfilling and rewarding experience.
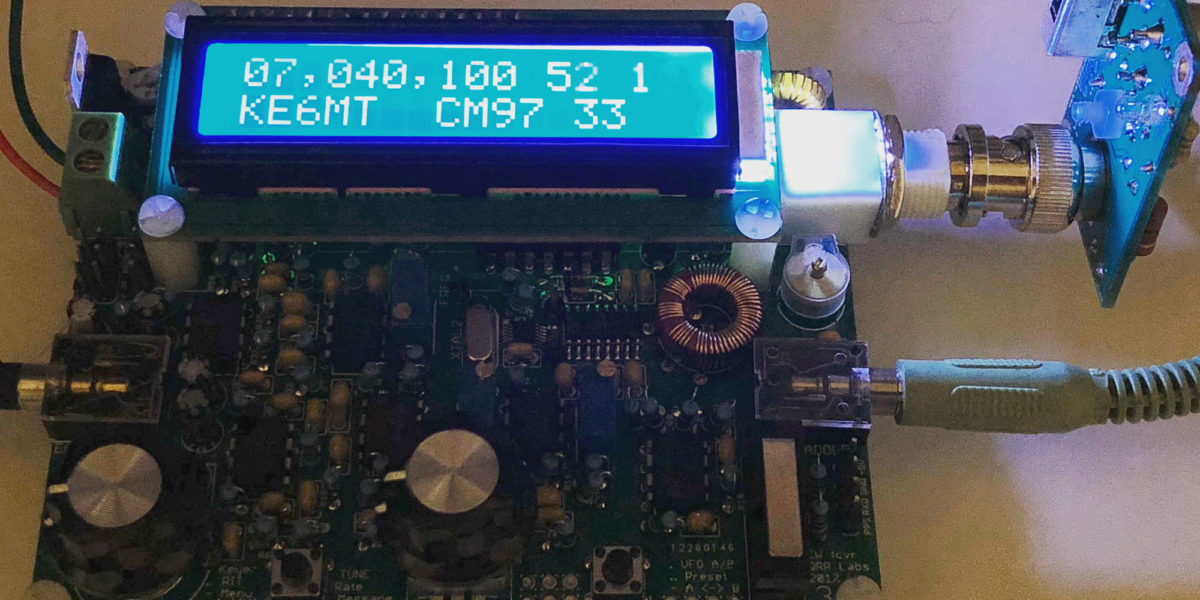
QRP Labs QCX
This amazing little rig was the catalyst for this post. Ever since it was released last year, I’ve had my eye on it. I didn’t strictly need to buy it. I already had my Yaesu FT-817ND, and my trusty little Mountain Topper MTR-3B. But I like building kits, and really believed it would be fulfilling, operating a rig I had personally built. I was right. I also wanted to be able to prove that a new (or old) ham could get into HF operation for around $100 all-in.
A few weeks ago I ordered the kit. It showed up surprisingly fast. It was in my hands a week later. Apparently, they keep some units stocked in the US now. I couldn’t resist the urge to dive right into the build, so I got it done over 3-4 days.
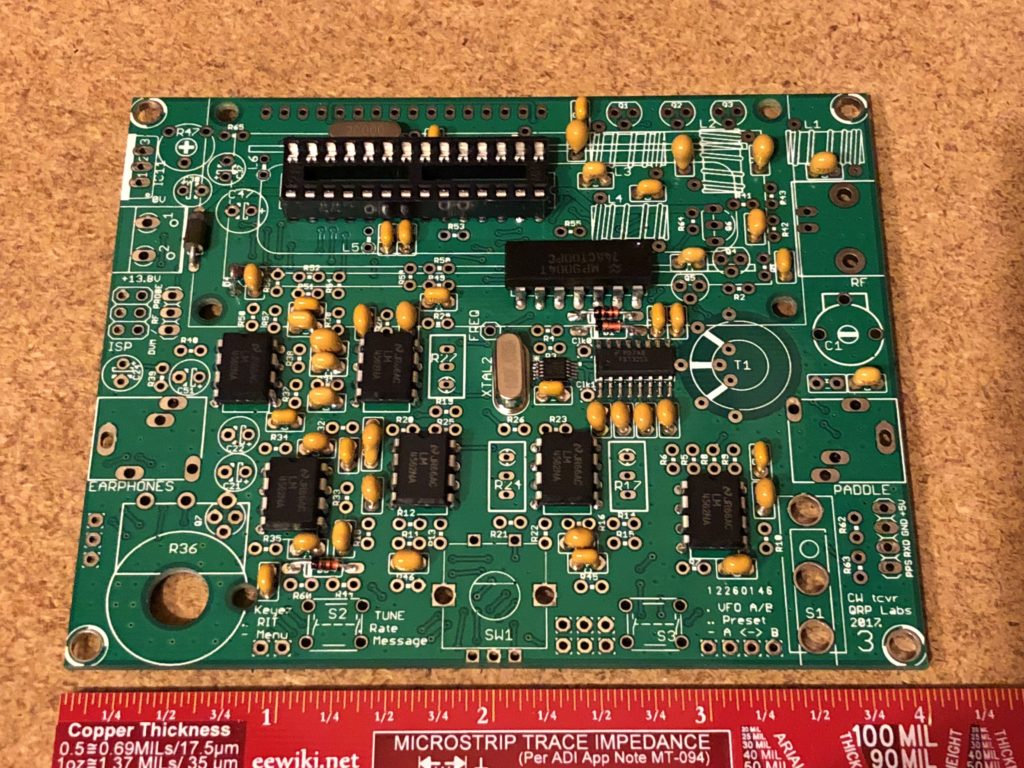
About 30% into the QCX build
Some Electronics Experience Helpful
Now, I will pause here and say that the QCX build is a little bit involved, and it would be helpful to have some soldering experience, and perhaps to have put together some other, simpler kits. I’ve done a decent amount of soldering and assembled maybe a dozen electronics kits, but I’m nowhere near what I would call an expert.
Which Band
I won’t go into extreme detail here, but I chose, and would recommend, 40 meters. At least where I am, it’s a band that’s usable almost any time of day and has a good deal of use by other hams.
Thorough Instructions
I’ve never encountered more detailed, thorough, helpful instructions with anything I’ve ever built. The documentation for the QRP Labs QCX is simply the best I’ve encountered. It really walks you through every step. And if you happen to get hung up at all, there are several people who’ve created YouTube videos of their builds.
Toroids
I’ve heard rumors of people thinking toroids are difficult to wind. I honestly haven’t ever heard it directly. I admit, however, that the first time I ever had to wind one, I was apprehensive. This kit wasn’t my first time winding them, so I didn’t have any of that apprehension this time around. In fact, I was kind of looking forward to it. All of them were easy except one: the receiver input transformer—”T1.”
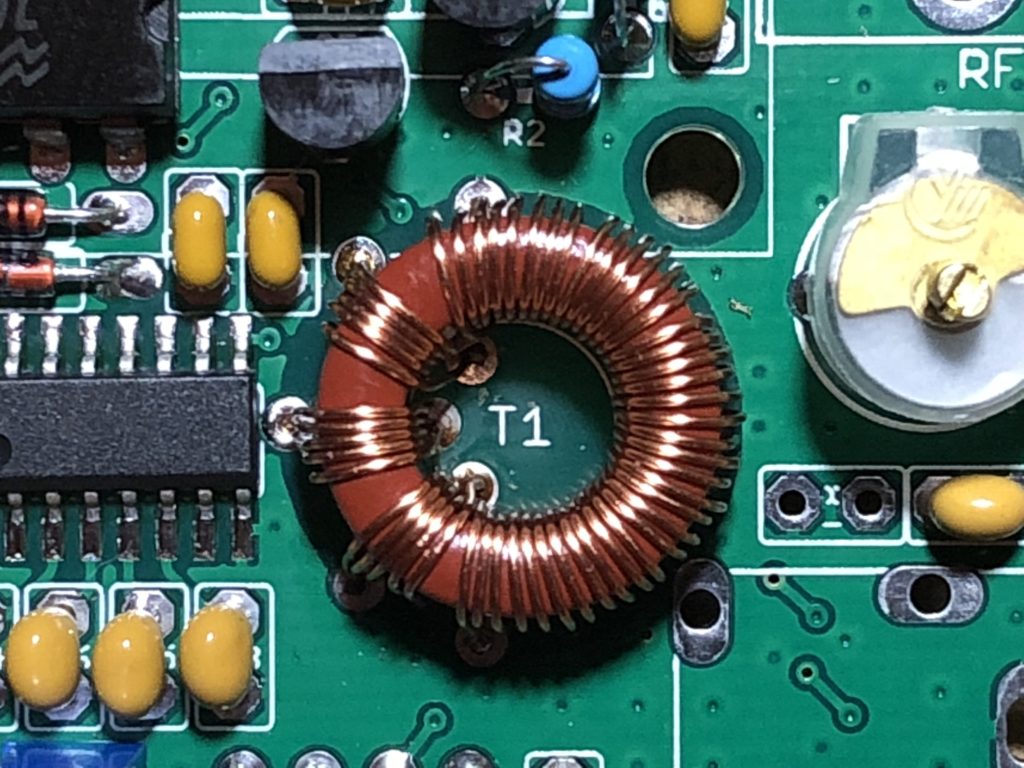
T1. I’m just going to go ahead and call it “TERMINATOR”
This has four separate windings on it, accomplished by winding them all at once and leaving loops at certain points which are then cut to form the separate windings. Depending on the band the radio is being built for, this transformer can have up to 83(!) turns. In my case, it was an “easy” 53 turns total. Still, there’s not a whole lot of room to work with. The winding itself was easy. The trouble I had came when I cut it into the separate windings and attempted to put all of the wires in the right place. The windings started crossing over each other, making things not only look unkempt, but actually making it hard to tell if the leads were going to the appropriate places. With a lot of patience, I eventually sorted this out. It didn’t take any special skills—just patience.
Final Assembly
Mostly, you’re just soldering the right parts in where you’re shown they should go. After getting the toroids wound and installed, there are a few more parts and you’re done! The kit is set up so you have the option of mounting the knobs and other connective hardware off the main board (on your case). I opted to mount them on the board.
Unlike some kits, rather than assembling and testing things in stages, it’s recommended to just assemble the whole thing, then test. After I got everything together, I plugged it in to see if there was any smoke. No smoke!
Adjustment and Alignment
The QCX has its own test equipment built in! There are some simple adjustments to be made after assembly and you’re good to go. It took me about 20 minutes to get this done.
Testing the QCX
I ran the rig connected to a QRP dummy load I have, and keyed down to measure the approximate power output. It put out approximately 2.5-3 watts with around 12 volts in. According to the graphs in the manual, it would put out about 4.5 watts at a full 13.8 volts. I ran it on WSPR (yes, it can act as a WSPR beacon!) all night and it performed well.
QRP Labs QCX Running WSPR
The next day, I tested it out on CW. It passed with flying colors.
The QCX is a Great Kit
So, there it is. I believe the QCX (which stands for QRP-Labs CW Transceiver, by the way) is an excellent way to jump into HF. It’s frequency-agile within the chosen band, so you can tune around and make contacts. It has a great filter and nicely sensitive receiver. All the good bits are there. It even has a CW decoder, though I recommend not relying on it (or any decoder)—humans are better at it, and you’ll want to learn!
Here are a few great YouTube videos:
OK, on to the antenna!
QRPGuys No-Tune End-Fed Half-Wave Antenna
What better than a super-simple antenna to match a super-simple rig? There are lots of options here. You can build your own dipole – it’s one of the most simple antennas you could build. But then you need a way to get the whole thing up in the air, you need coax to run to the center of it, etc. There are complications and tradeoffs with every antenna. What I’ve chosen for this setup, though, is an end-fed half-wave antenna. Even within end-fed antennas, there are lots of ways you can do things. In this case, however, we have a 64:1 impedance transformer and capacitor on a circuit board shaped to allow winding the antenna wire right on it. This particular kit was given to me for testing by Doug Hendricks of QRPGuys, but I’ve built and regularly use other EFHW antennas.
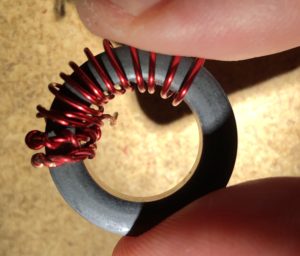
Halfway through winding
There’s very little soldering to do on this kit. Probably the hardest part is winding the toroid, and that isn’t even very difficult. Since the toroid and its windings compose an autotransformer—a transformer in which there is one winding, a portion of which is common to both the primary and secondary circuits. It’s a lower-loss way of transforming the super-high impedance of an end-fed half-wave wire, which can be around 2.5-4.5k ohms, depending on the design, length of wire and surrounding terrain. The first three windings of this transformer consist of the wire wound back on itself and twisted, so that we have 3 primary windings and 24 secondary windings. This is a ratio of 8:1, which gives us an impedance ratio of 64:1, taking that 2.5-4.5k ohms down near where we want it, 50 ohms. The closest number being roughly 3.25k ohms. You’re not going to be measuring any of this—I’m just explaining a (perhaps overly) simplified version of the theory.
After getting the board all together, you measure wire for the desired band (it has recommended lengths in the instructions and right on the board). I used to just use a yardstick or 2-foot level, counting off lengths of wire until I got to the right number. I’d even add little bit each time. For this one, I pulled my measuring tape out to 20 feet, pinned the wire under a weight, and measured out 3 lengths of that, then another 5 feet or so. The recommended length was actually 61′ 6″ for a 40m antenna, but I always add some, plus I’d somehow lost the capacitor that comes with the kit and had replaced it with a lower-value capacitor I had around (but still rated for high voltage). My hunch was that the lower-value capacitor might increase the needed length of wire for my antenna. I’m not sure if that was true, but in this case, I put the antenna up in the back yard in inverted-V configuration, and the SWR was pretty good (<1.5:1) across the entire 40m band. Not being one to mess with a good thing, I did no trimming. Good to go!
QRPGuys Iambic Mini Paddle with Base
This was my first CW paddle. It wasn’t the first one I used (that was a borrowed Bencher paddle – good stuff!) but it was the first one I bought, so that I could start practicing sending of Morse code. Sure, I could practice with a straight key, but since I knew I’d mostly be using a paddle for day-to-day (and SOTA) use, I went with a paddle. With a “keyer” circuit, either built into the radio (most modern radios have this, including the QCX), or a separate keyer, the paddle sends a continuous stream of “dits” on one side, and “dahs” on the other. If you want to know more about dual-level paddles (and iambic keying), check out this section on Wikipedia.
This paddle is one of the least expensive options out there for a dual-lever paddle. And the assembly consist mostly of soldering circuit boards together. It’s quite an ingenious design concept. The paddles are made of thin stainless steel mounted to come into contact with a center post holding a washer. A very simple, fool-proof design.
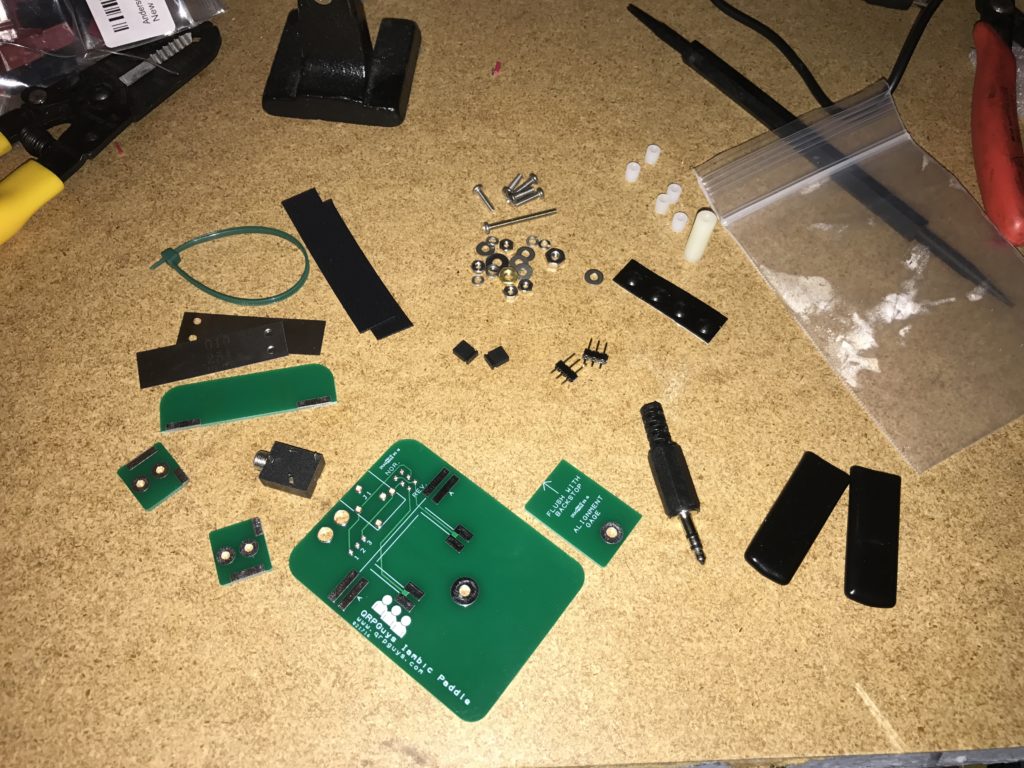
Here are the parts
There are some tricky aspects to this, like getting the tiny nuts onto tiny screws. But overall, it’s a pretty simple assembly process. Just make sure you take the time to align everything correctly! The instructions are very helpful, and all but guarantee success.
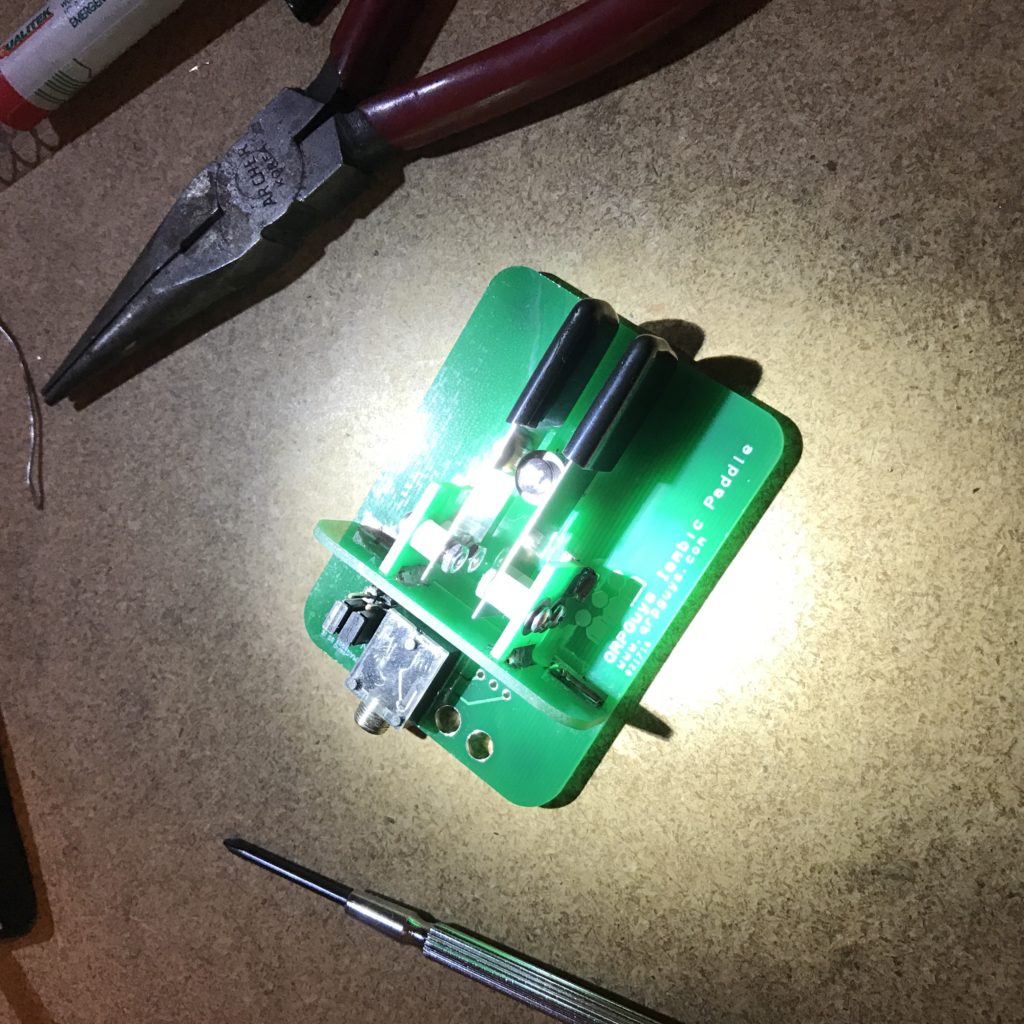
QRPGuys Iambic Paddle Assembled
After using the paddle a bit, I decided I wanted tighter spacing. One way to accomplish this is simply to bend the paddles a bit. They tend to spring back, so I couldn’t bend them enough without removing them. I opted to find a bigger washer. After visiting a couple of different hardware stores, I found a washer that had a bigger outside diameter, while still having a small enough inside diameter. It was just slightly too big, so I filed down the sides a little bit. Now it’s perfect!
Learning Morse Code—CW Academy
I’m not going to go super in-depth on CW Academy. I’ve covered it in more depth in other posts on my blog, as well as a little bit in this post. There are lots of different ways to learn Morse code, but I think the most important and common thread to all who’ve had success with it, is to dedicatedly put in the time to learn it. You must do lots of sending and even more listening. Mostly listening. Like, way more listening than sending. There are lots of good tools out there, and I’ve used them with some success, but with a busy life and lots of priorities, it’s hard to put in the time to really get moving on CW/Morse code. CW Academy provides the path and (more importantly for me) the accountability to make progress. It’s free, and with Level 1, you’ll learn enough to get on the air with your new QRP Labs QCX and QRPGuys antenna.
Summary
There are lots of ways to do any given activity in amateur radio. I’m presenting one way to do one thing in amateur radio—get on the air on the 40-meter band. It’s a big thing! But any ham with a soldering iron and some patience can do this. Whether you’re a Technician-class just starting out, or you tested all the way to Extra-class right out of the gate and you’ve been trying to figure out what to do with it, here’s something almost any ham can do.
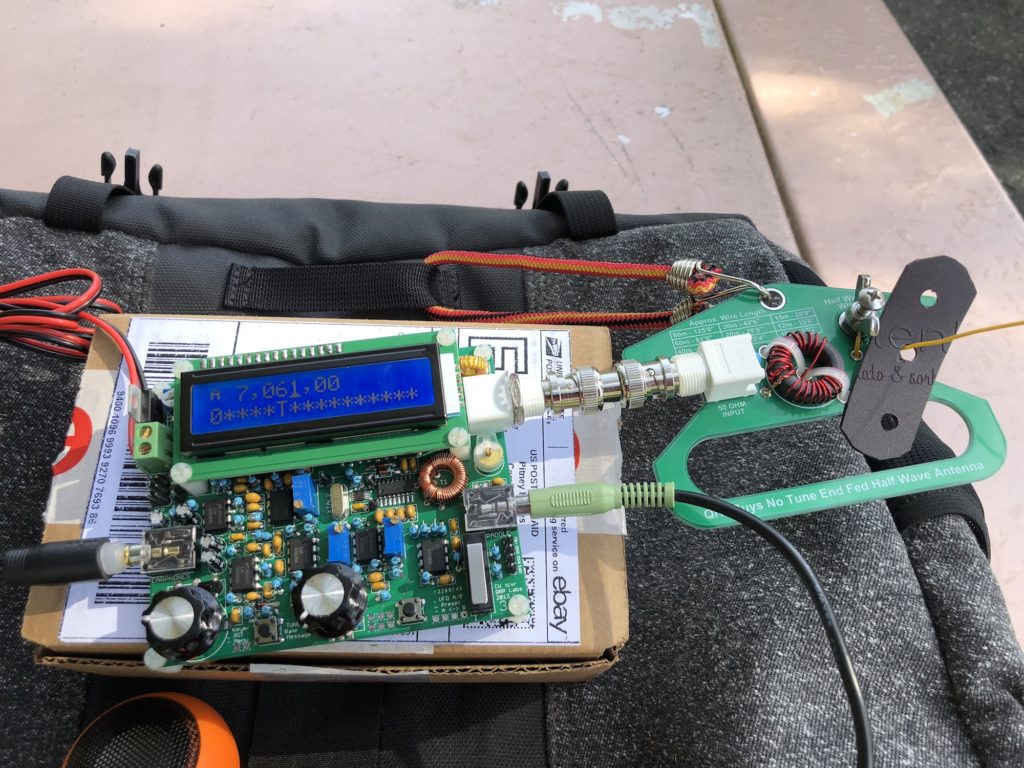
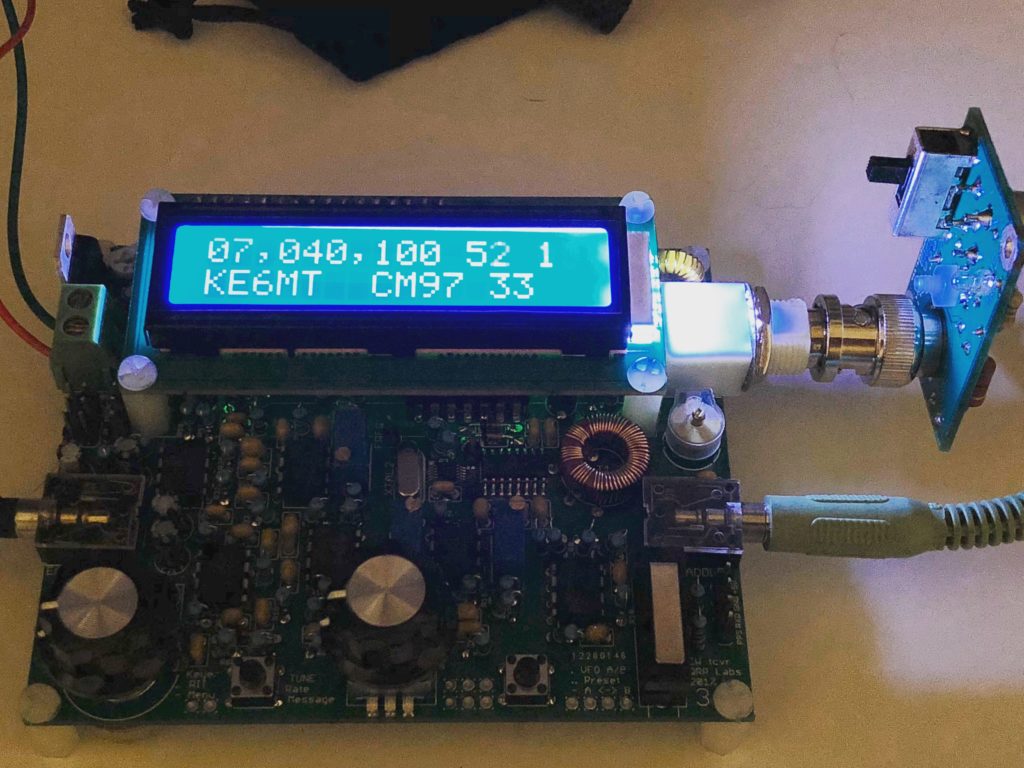
QCX and EFHW antenna in action