| Activation Date: 25 August 2018 | |
| Transport: Drive/Hike | Distance: 0.5 miles |
| Elev. gain: 180 feet | Time: 10-15 minutes |
| Rig(s): MTR-3B, FT-891 | Band(s): 40m (cw+ssb), 20m (cw) |
| Antenna(s): Linked Dipole – 40/20m | |
| Cell Service: Marginal (T-Mobile) | |
| Parking: End of Grouse Ridge Road | |
| Trailhead: N/A | |
| Fees/Permits: None | |
| Route: Go up the road, past the gate | |
| Dogs: Yes | Toilet: Yes |
| Antenna Support: Some trees below summit / lookout | RF Noise: Low |
This was the first summit of two for the day. Being just a little bit crazy, I decided I’d take my two sons and our two dogs up to the Sierras for a day of SOTA fun. I wanted to do summits that involved little to no hiking, to save time and make it easy on the boys and our older dog. Also, I really wanted to get this summit done after missing an opportunity to get it last year. So up we went!
Getting There
This is a pretty rough road. I’ve taken my car up it before, but it’s a bit risky for passenger cars. This time, I took the Honda Pilot. This allowed us to worry a bit less and make better time. I’d downloaded offline maps on Google Maps before driving here, since I knew cell reception would be sketchy. I also knew that Google had (fairly) reliable directions to my destination. Getting off of Highway 20, it’s paved for a while (Bowman Lake Rd) before turning to dirt (Grouse Ridge Rd). It’s about 5 miles or so on the (mostly rough) dirt road. Before arriving at the top.
We kept going past the campground and past the place where a lot of people park to hike down into the valley below. Heading up toward the lookout, there’s a gate. We parked off to the side, about 50 yards or so before the gate.

Parked above the road
Short Hike
It’s quite a casual stroll up to the top. It’s definitely uphill, but not very far at all. Walking up to the gate, a Sheriff truck was parked there, along with a sedan that had somehow made it all the way up here!

Starting our little hike up to Grouse Ridge Lookout
Within a couple of minutes, we could see the lookout.

First glimpse of the Grouse Ridge Fire Lookout
A little further up, we walked past what seems to be some kind of repeater setup – perhaps for the Forest Service.

Looking up at the lookout and repeater
It was a bit smoky, but nearby summits were pretty easy to spot, including Black Buttes (W6/NS-170) I’d done last year when I was in the area.

Black Buttes left of center
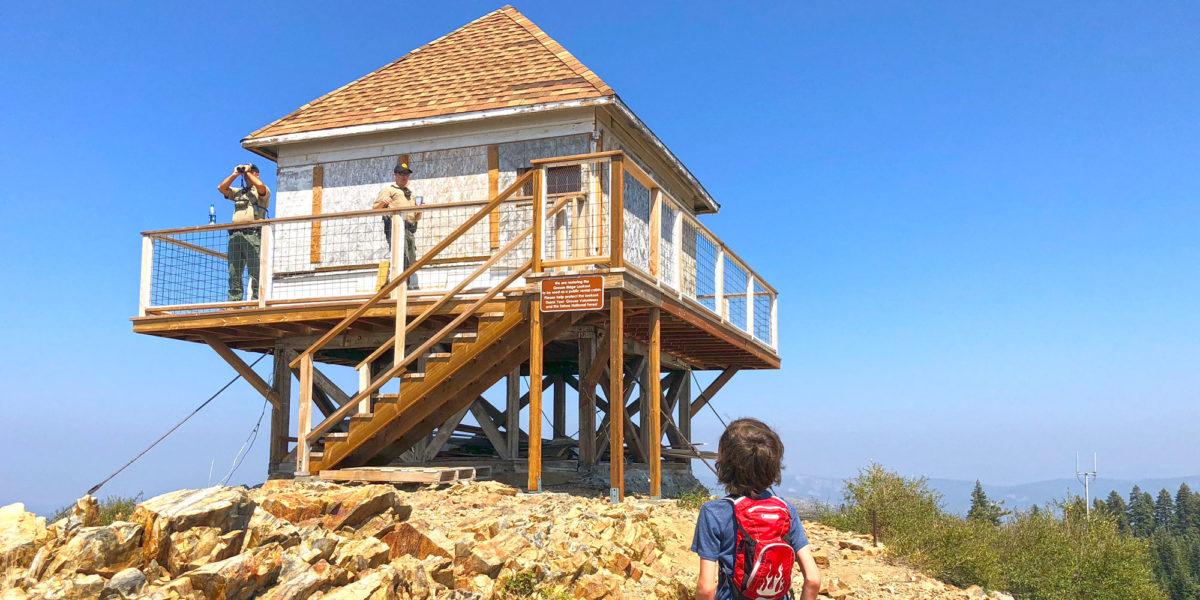
Arriving at the top, we saw the sheriff deputies up on the lookout, looking around with binoculars. We exchanged pleasantries and I told them what we’d be doing on the summit. They seemed faintly interested and wished us a good time.

Miles chatting with the deputies
Setup and Operation
I briefly considered throwing my antenna into the trees below the lookout, but eventually figured out a way to set it up out of people’s way by putting my mast (fishing pole) up on a corner of the lookout. I’d be using the dipole, enabling me to run the full 100 watts out of my new Yaesu FT-891. This would be the first real field test for the FT-891. I had the MTR-3B for operating CW, and planned on using the FT-891 for SSB. This plan ended up changing, which I’ll talk about in a bit.

Mast partially extended up on the lookout
I got everything set up in the shade and started out with 40 meters CW on the MTR-3B. While my boys threw sticks for the dogs and explored, I started making contacts. However, my paddle (Palm Pico) was acting funny. Once in a while, the “dit” side would send alternating dits and dahs, almost as if I were pressing both sides. Very frustrating if you’re trying to send intelligible code! I somehow managed to make a few contacts this way, before taking a breather and plugging in my backup paddle – the QRPGuys iambic paddle. This seemed to handle the issue and I was able to get the rest of the contacts for 40m done on the MTR this way. It still seemed to be acting a little funny, but that could have been my imagination, or just the fact of switching to a different paddle.

Using the MTR before hooking up the backup paddle
After that, I hooked up the new Yaesu FT-891 to make some voice contacts with 40 meters SSB. This worked beautifully.
I took a little break to eat some food and check on the dogs and kiddos, while pulling down the center of the dipole and disconnecting the links to switch to 20-meter operation. I pushed the mast back up and went back to my operating position.

My little spot in the shade of the lookout
Mic Trouble!
I was using my custom mic interface I’d put together for the FT-817 – the interface and pinout were the same for this. It’s nice to have a little headset (with a better mic on it, no less) rather than the hand mic. This had worked just fine on 40 meters, but I soon found out something was very wrong on 20 meters. Whenever I’d talk, the ALC meter would get pegged and the audio coming out of the monitor was very distorted. Turning off compression seemed to alleviate it somewhat, but the audio was still very distorted. Turning the mic gain down almost all the way made things a little better, but then it was putting out way less power (around 5-10w instead of 50+). I ended up abandoning 20m SSB and went straight into CW operation.
Since I was already on the FT-891, I just checked the power setting (I think I had it set to 50 or 80 watts) and started working 20 meters CW. This was my first time ever running power with CW and boy was it easy to get the contacts made! Also, I’m used to really good receive quality with the MTR-3B, but this was absolutely heavenly! I had the CW filter width set to 500Hz and didn’t find the need to narrow it. I perhaps could have even gotten away with widening the filter a bit, but then I’d have to go into a menu setting to switch from “narrow” to “normal” filter ranges. I love this radio, but getting to some of the options is a bit clunky! Oh well. I had a great time operating CW on it and may do more of that, instead of only using the powerful rig for SSB. Only on summit trips where I don’t mind carrying the weight, of course!
Of note on this activation is that I got four S2S Jorge EA2LU(summit-to-summit) contacts and even got over in Spain!
With a successful activation in the bag, I enjoyed the summit for a few more minutes with my boys, took some pictures and headed back to the vehicle for the next summit – W6/NS-306, Lowell Hill Ridge.

Looking East from Grouse Ridge toward Black Buttes

My boys and dogs in front of the cute outhouse (haha!) just below the summit
Activation Log
| Time | Call | Band | Mode | Notes |
| 19:40z | K0RS | 7MHz | CW | |
| 19:41z | NG6R | 7MHz | CW | |
| 19:43z | W6TDX | 7MHz | CW | |
| 19:44z | NQ7R | 7MHz | CW | |
| 19:46z | WB0USI | 7MHz | CW | S2S |
| 19:47z | NW7E | 7MHz | CW | |
| 19:48z | NS7P | 7MHz | CW | |
| 19:49z | KX6A | 7MHz | CW | |
| 19:51z | KD7CJV | 7MHz | CW | |
| 19:54z | N0DET | 7MHz | CW | S2S |
| 19:57z | N7YY | 7MHz | CW | |
| 20:06z | W7BET | 7MHz | SSB | |
| 20:08z | K7DJL | 7MHz | SSB | S2S |
| 20:28z | N6JFD | 14MHz | CW | S2S |
| 20:31z | VA6FUN | 14MHz | CW | |
| 20:32z | AC1Z | 14MHz | CW | |
| 20:34z | EA2LU | 14MHz | CW | |
| 20:35z | W7USA | 14MHz | CW | |
| 20:35z | W0MNA | 14MHz | CW | |
| 20:36z | W5GAI | 14MHz | CW | |
| 20:37z | W0ERI | 14MHz | CW | |
| 20:38z | AG5QH | 14MHz | CW | |
| 20:38z | N2ESE | 14MHz | CW | |
| 20:40z | W7GJ | 14MHz | CW | |
| 20:41z | ND0C | 14MHz | CW | |
| 20:42z | KD8DEU | 14MHz | CW |
Map
Equipment Issues Follow-Up
Further investigation showed that the issue with the Palm Pico paddle was that I’d set the spacing a little too tight on the “dit” paddle. When pressing it hard enough, flex in the case caused the center conductor to come into contact with the “dah” paddle.
The issue with the audio distortion on SSB with the FT-891 is still under investigation. I suspect something having to do with RF getting into the audio circuit through the mic cable, possibly due to my proximity to the antenna. Until I get this sorted out, I’ll be bringing the stock mic with me.