| Activation Date: 11 November 2017 | |
| Transport: Hike | Distance: 4.8 miles |
| Elev. gain: 1225ft | Time: 2.2 hours |
| Rig(s): Yaesu FT-817 | Band(s): 40/30/20m CW, 40/20m SSB |
| Antenna(s): End-fed half-wave | |
| Cell Service: Good (T-Mobile) | |
| Parking: San Andreas Drive | |
| Trailhead: San Andreas Drive | |
| Fees/Permits: None | |
| Route: Middle Burdell, Cobblestone fire roads | |
| Dogs: Yes – off-leash on fire roads | Toilet: No |
My first CW activation! Having completed CW Academy, I wanted to put my new skills to use. With my wife out of town for the weekend, my plans would have to include my two boys and our dog. I wanted to do a peak I hadn’t yet activated, and ideally also do a POTA/WWFF activation. Mount Burdell (called Burdell Mountain in the SOTA database) fit the bill.
Why CW / Morse Code
Why morse code / CW operation? Well, because it’s easier. For me personally, there are many other reasons, including the fact that it’s both fun and challenging to operate. But let’s get back to the fact that it’s easier. Let’s put it this way: would you rather try and make contacts with a 5-watt radio or an 80-watt radio? Using the Morse code to operate CW gives you that advantage without using an amplifier. And the radio can be even more simple, saving on weight and power consumption. I could go on and on about the advantages, but I’ll go ahead and get into the hike and activation.
Getting There
This is a simple drive to near the end of San Andreas Drive. You’ll see the trailhead right next to the road, and all parking is on the road. When I went, there were several cars parked on the road, but still quite enough room for many more cars.
The Hike

Starting our Mount Burdell hike
Per the trail map, there are lots of different ways to get to the summit, but we chose to take the most direct route – the fire roads. Taking this route also allowed us to have our dog off-leash (under voice control). Dogs are allowed off-leash on the fire roads here.

Tashi enjoying the hike
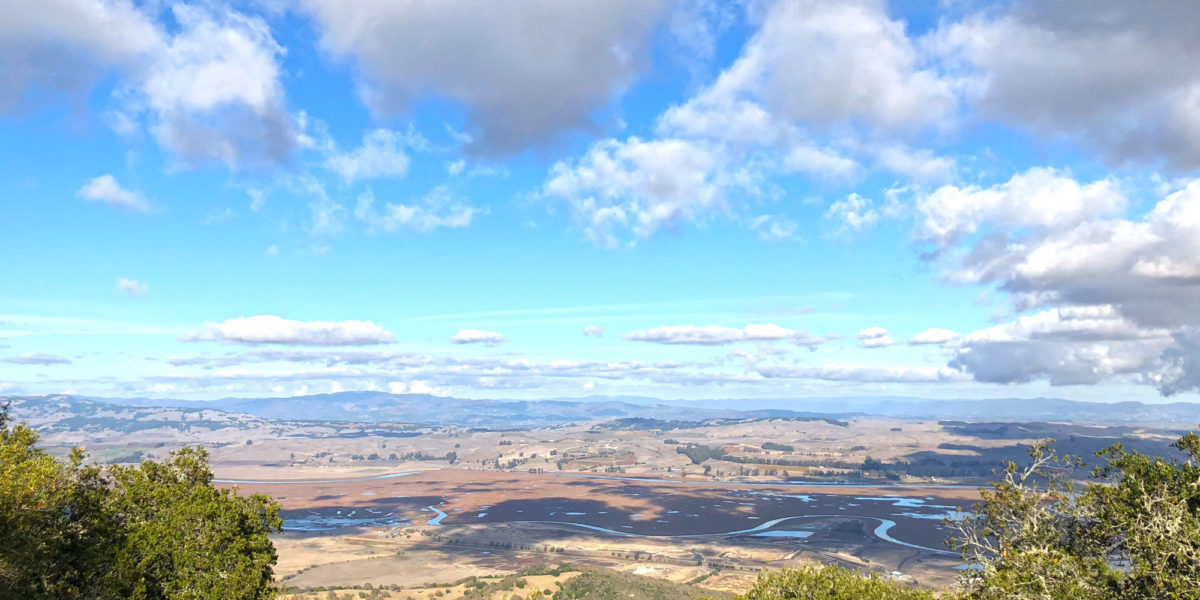
The hike starts out at a gentle grade and maintains it pretty much the whole way. We had perfect weather, with a reasonable temperature and puffy clouds all around. As the road climbs, the views only get better.

Looking toward Oakland and San Francisco
Nearing the top, the fire road crosses the (sorta) paved road to the radio tower located near the summit.

Getting close to the top
The radio tower near the top looks pretty cool because it’s designed more like a watchtower than a “typical” radio tower.

Mount Burdell radio/communications tower
A little trail proceeds to the true summit from where the fire road meets the paved road. This is probably the steepest part of the hike, and it’s not that steep at all.

Final bit of trail to the summit ridge
And before you know it, you’re at the summit! There’s a rock wall demarking some old boundary of some kind. Jeff, AA6XA, noted in his blog that it’s the style of rock wall you’d find in New England. I agree. In fact, it feels somewhat odd to find it here, though I’ve seen them elsewhere in the area north of San Francisco.

Arriving at the summit of Mount Burdell
Up to this point, we weren’t in Olampali State Historic Park. Once we started gaining the summit ridge, that put us within the boundaries of the park, allowing this to count for both SOTA and POTA/WWFF.
The first order of business was to find a good spot for the boys’ hammock, hopefully near a spot that might work for setting up the antenna, too. There were lots of short trees on the summit, so we really had our pick. After looking around a bit, we settled on a couple of trees right near where we’d arrived on the summit ridge. I got the hammock up and the boys settled in for lunch.

Ready to relax and eat lunch!
Setup
After looking around for possible spots, I decided on setting up right on the rock wall, with my “squid pole” in the rocks. The wire went from the SOTA Tuner hooked up to the FT-817, up the pole, and over the highest branch of one of the nearby short trees. The whole antenna was probably about 15-20 feet off the ground, running N-S. Good enough for a quick setup!
My FT-817 doesn’t have an internal CW filter module (dang, those filters are pricey!), so I had a lot of stuff to set up:
- FT-817ND and SOTA Tuner
- External battery
- SOTABeams Filter Module (external)
- Power cables
- Headphones
- Paddle

The KE6MT SOTA/POTA station
I was already running behind my planned time (getting kids up a big hill takes a while!), so I was hurrying to get set up. It still took me at least 15 minutes. Oh well—the weather was pleasant and the kids were happy!

Operating position, showing antenna
Operation
I planned on working 30 meters, then connecting the link on my antenna wire to switch over to 40m and then 20m. I had posted an alert on SOTAWatch.org and a post on the POTA Facebook group. Hoping to get a chance to try the “RBNHole” automatic spotting system for SOTA, I went ahead and found a clear frequency on 30 meters and started calling CQ. I was automatically spotted for SOTA right away!
The very first person to answer my call was Elliott, K6EL. And within moments, I had several contacts. Mostly SOTA chasers, I believe.
Now, POTA doesn’t have the same amazing automatic spotting system as SOTA, but there are some devoted POTA people out there, including Randy N6MMA. He kept an eye on RBN and acted as a cheerleader for me, posting spots and getting people in the Facebook group to contact me. Thanks, Randy!
I stayed on 30 meters until I stopped getting answers after a few calls. Then I moved to 40 meters. I posted this on the POTA Facebook group and again was automatically spotted for SOTA. I got one contact here (hi, Jess!) and shortly after, started hearing some other station in a QSO. By this time, I could tell my kids were starting to get a little bit restless, so rather than try to find another frequency on 40 meters (which seemed to be busy with a RTTY contest), I moved up to 20 meters. I kept at that, making several more contacts before it dried up.
Having just about worn myself out with CW for the day, and since my kids seemed to be happy for the time, I plugged in my headset and went to 40 meters SSB to do some voice operation. I probably should have stayed on 20 meters, then switched to 40 meters. But for whatever reason just went to 40 meters. I got one contact there and didn’t get any more answers for a bit, so I switched to 20 meters.
On 20 meters, I got one contact right away then didn’t get any answers for a while. I was just about ready to pack it up when more calls started coming. I got several more here, including Steve WG0AT, the goat hiker himself!
Once 20 meters dried up, it definitely felt like it was getting late in the day. I think this was definitely one of my longer activations.
It’s interesting mixing the SOTA and POTA activations. Though they share geography in some cases (such as this one) they are two very different worlds. SOTA activations are usually brief, and expectations of activators are pretty simple since it can often be hard just to get to the activation zone. With POTA/WWFF, since the operating locations are typically easier to get to, there’s a higher expectation of timeliness and communication, as well as a (typically) longer activation period.
SOTA is very near and dear to my heart—I’ve always loved climbing mountains and SOTA completes the experience for me by giving me something very fun to do at the top. I also like POTA since it gives me (and many others) an excellent reason to get out and operate. I may not be a die-hard POTA guy, but I’m sure glad the program exists and it’s really got some great people.
Operating CW on this activation did prove to be difficult in the sense that I’m new to the mode and the code, so I had to ask for lots of repeats. Also, my paddle connections were in need of cleaning, so I was having trouble sending occasionally. I was full of nerves at the beginning, and probably didn’t really settle in and relax for the entire two hours I operated! But boy, up on that summit, those signals sure did come through nice and strong! So in that way, it made the activation quite a bit easier than phone/SSB operation.
All in all, I had a fun time and so did my boys! I’ll be doing more CW operation for sure. In fact, going forward, I plan to make most of my activations CW.
Thanks to all the chasers, for being there, and for being patient with this new CW operator!
Activation Log
| Time | Call | Band | Mode |
| 21:35z | K6EL | 10MHz | CW |
| 21:44z | NU7A | 10MHz | CW |
| 21:45z | AA0BV | 10MHz | CW |
| 21:47z | KR7RK | 10MHz | CW |
| 21:48z | W6STR | 10MHz | CW |
| 21:50z | N9MM | 10MHz | CW |
| 21:52z | W0MNA | 10MHz | CW |
| 21:54z | KX0R | 10MHz | CW |
| 21:55z | AB6HO* | 10MHz | CW |
| 21:58z | W0ERI | 10MHz | CW |
| 21:59z | W6WW | 10MHz | CW |
| 22:02z | W6LEN | 10MHz | CW |
| 22:05z | K7VK | 10MHz | CW |
| 22:06z | KG8P | 10MHz | CW |
| 22:08z | W0ZAP | 10MHz | CW |
| 22:11z | KE6RS | 10MHz | CW |
| 22:12z | VE6UX | 10MHz | CW |
| 22:27z | W6LEN | 7MHz | CW |
| 22:37z | N9MM | 14MHz | CW |
| 22:43z | AE5B | 14MHz | CW |
| 22:46z | VE6UX | 14MHz | CW |
| 22:47z | N4EX | 14MHz | CW |
| 22:49z | W7RV | 14MHz | CW |
| 22:51z | W5GAI | 14MHz | CW |
| 22:53z | W0ZAP | 14MHz | CW |
| 22:55z | VE6CCM | 14MHz | CW |
| 22:57z | KE5AKL | 14MHz | CW |
| 22:59z | WB4OSS | 14MHz | CW |
| 23:09z | WB7ULD | 7MHz | SSB |
| 23:16z | AE5B | 14MHz | SSB |
| 23:21z | W8ZST | 14MHz | SSB |
| 23:22z | KG5CIK | 14MHz | SSB |
| 23:23z | WG0AT | 14MHz | SSB |
| 23:25z | WD4CFN | 14MHz | SSB |
* I think I got this one wrong. It should be AB6SO. Sorry Vic!